Vaccine dispensing
Vaccine dispensing/administration
This functionality is available from mSupply mobile v8.0.0 onwards
This work was kindly sponsored by the New Zealand Ministry of Foreign Affairs and Trade
This chapter describes the main dispensing process. Other relevant pages include:
- Setup instructions
- Recording Adverse Drug Reactions
- Dashboards for Vaccination Monitoring
- Web portal entry of Registrations and Adverse Events
Introduction
mSupply mobile has handled dispensing since 2019, and cold chain equipment monitoring since version 7 (March 2021).
Now it also has a specific workflow for vaccine dispensing. This differs from normal dispensing in several important ways:
-
Patient registration collects a lot more data than what is typically required for dispensing a prescription, such as:
- Has the patient ever had Covid-19 before?
- Is the patient pregnant?
- Is the patient lactating?
- Has the patient ever had an adverse reaction to a vaccine previously?
-
The dispensing workflow is greatly simplified:
- When an existing patient is chosen, the extra information fields are chosen, as many of them are time-dependent, so the current value for the field might be different from the saved value. For instance, the patient might not have been pregnant when they were recorded in the system some weeks or months ago, but they are now
- Only items marked as vaccines are shown, so there is no need to type in the item name- you simply choose from the list
- The dispensed quantity is always one, so no quantity field needs filling out
- The vaccine batch and VVM status are shown, and the batch used can be selected
- If using multi-dose vials, the batch with an open vial is chosen by default
- You can record that the patient refused vaccination
- You can record who the vaccinator was
-
Adverse Reaction Reporting is added to the system:
- The adverse reaction reporting data that is collected is configurable on the server, so can vary depending on the vaccination campaign being run at the time. Further documentation is available here.
Setup
Setup is technical and needs to be done carefully. We know you're careful ;-)
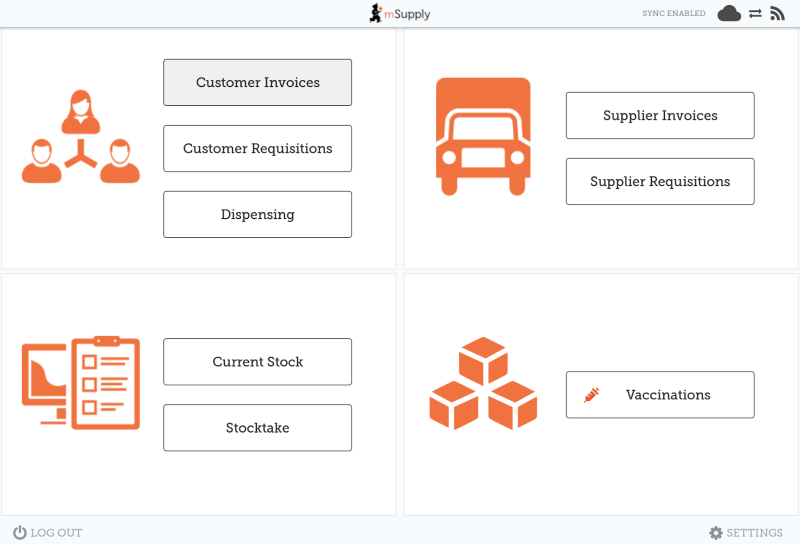
Using the module
Once Setup is complete, you'll end up with an mobile navigation screen that looks like this:
Step one: Patient details
Note that each step has a Cancel button which will cancel the process You can also press on any one of the three steps along the top of the window after they’ve been completed to revisit that step and edit details if needed.
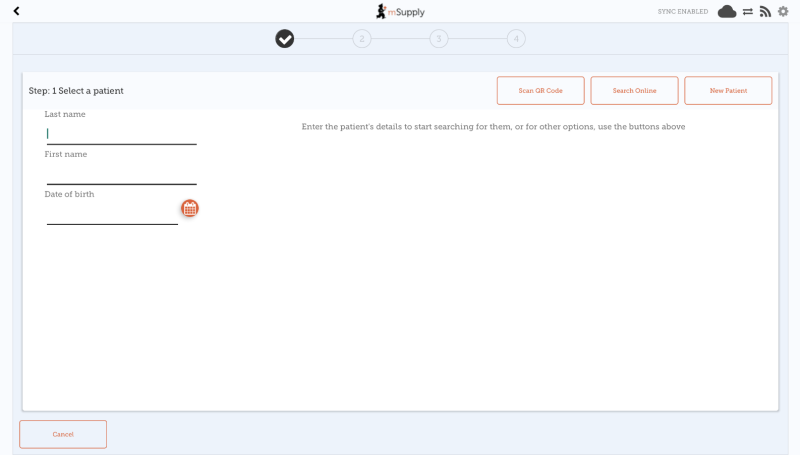
Selecting a patient
-
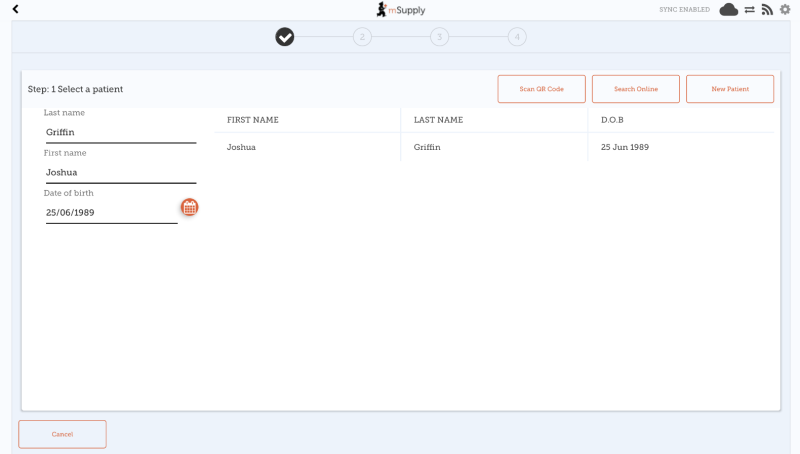
Search by last name, first name and Date of birth
- In the example below, we've entered the first and last name exactly, and the date of birth. Amazingly, there is only one match!
-
When typing, we look up in your local database first. If the patient still doesn’t come up, click the Search online button, which will use the same search information you have already entered and send a request to your cloud server to see if the patient exists anywhere in your system.
- NOTE: Requires the internet
- If you still can’t find the patient, click “New Patient”
- If you do find your patient, click on the row to go to step 2
-
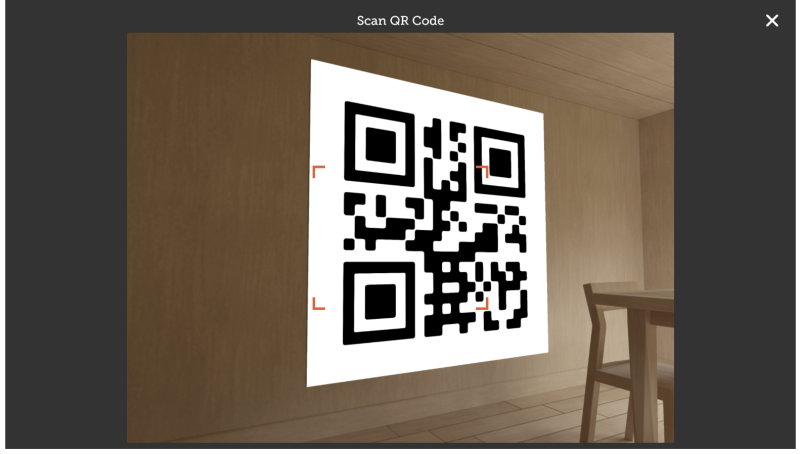
Alternatively (as of v8.1.0), it is possible to lookup patients by QR Code (provided these details have been loaded into mSupply).
- Upon tapping the Scan QR Code button a window will appear with a camera view
- As soon as a QR Code is found in the viewfinder mSupply mobile will attempt to first search in your local database for a patient that matches the QR Code scanned
- If the patient was not found locally and there is internet available, a search will then be sent to your cloud server to see if the patient exists anywhere in your system
- If the patient was still not found after a search on the cloud server (or internet is not available), you will get a message indicating that no patient was found, and will arrive back at the manual entry page, where you can either enter details manually (as per above) or try another QR Code.
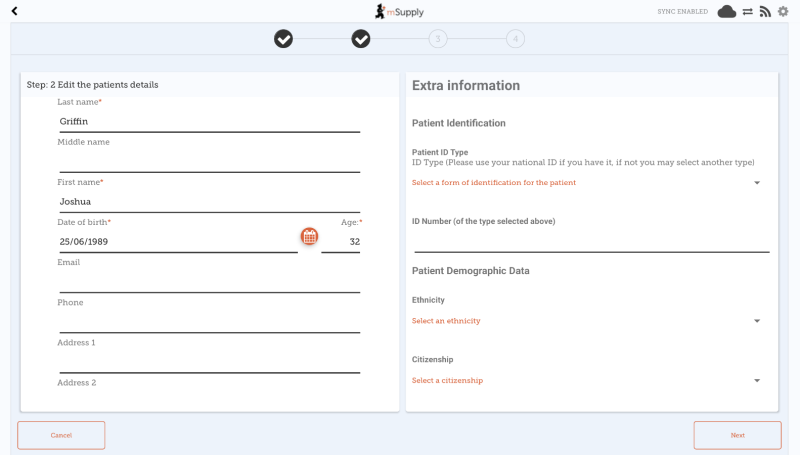
Step two: Add or edit patient information
After choosing a patient, you're shown the standard mSupply information for the patient in the left-hand panel, and any extra information that you have configured in the right-hand panel.
Step three: Additional vaccination details
Note that this third step is only available from mobile v8.1.0 onwards, and requires a form to be configured on the mSupply server for it to display. The form configuration drives the content shown in step three.
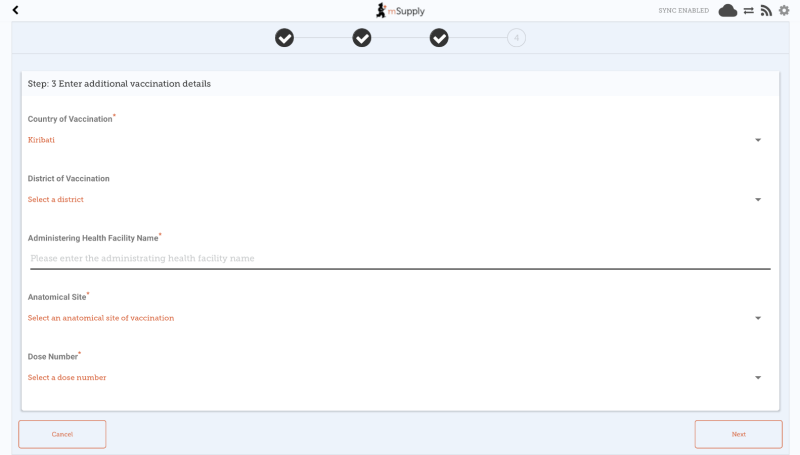
If using v8.0.X, or a form is not configured on the server, there will only be three steps total shown in the vaccine dispensing flow (step three will instead be dispense a vaccine.
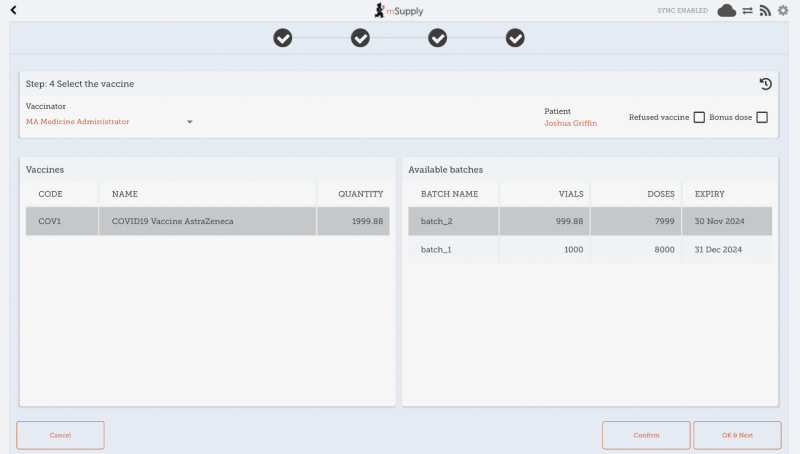
Step four: Dispense a vaccine
- Here you can select who the vaccinator is - these will be set up on your primary server
- You can also select which vaccine you are giving to the patient. The one which was dispensed most recently will be auto-selected for you
- You can also select which batch the patient received. The batch which is open and with the most recent expiry will be auto-selected for you
- Alternatively, you can select REFUSE VACCINE which will note that the patient refused to be vaccinated
- Tapping Confirm will send you back to the menu page
- Tapping OK & Next will allow you to vaccinate another patient.
Refused vaccinations
If the patient refuses to be vaccinated, then check the Refused vaccine checkbox at the top-right.
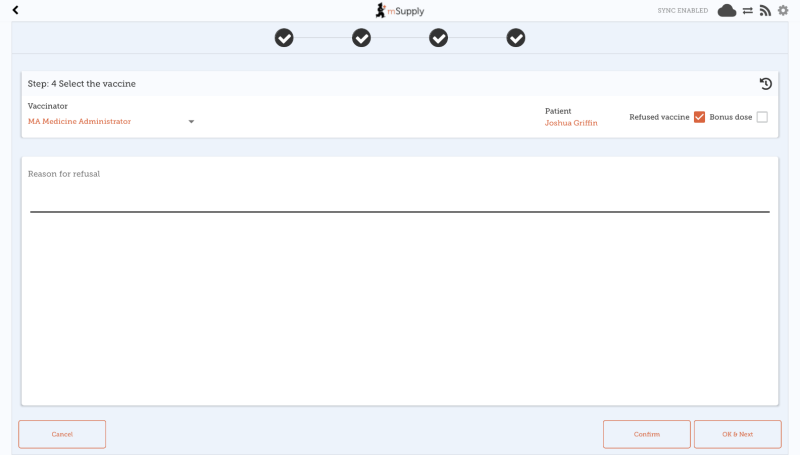
A text field will then become available to record a reason for the refusal.
A note will be recorded on the patient's file with the date of refusal, and the reason (if one was specified).
Adverse Reactions
You can record an adverse drug reaction (ADR), or specifically in this case, an Adverse event from immunisation (AEFI). As this is not restricted to vaccines, the functionality is described in a separate page here.