External Inbound Shipments
External Inbound Shipments are used to receive stock from external suppliers. Typically these will be based on a Purchase Order, however you can create a manual Inbound Shipment requesting stock from an external supplier in the same way that you would when requesting from an internal supplier. For details of external inbound shipments which are not linked to a purchase order, see the Inbound shipments page.
When an External Inbound Shipment is linked to a Purchase Order it provides additional features for tracking deliveries, managing foreign currencies, and optionally authorising individual lines before receiving goods.
Viewing External Inbound Shipments🔗
External Inbound Shipments appear alongside regular Inbound Shipments in the Inbound Shipment list.
Identifying External Inbound Shipments🔗
In the Inbound Shipment list, you can distinguish External Inbound Shipments from other types by the icon shown next to the supplier name:
- A truck icon indicates an External Inbound Shipment (from a Purchase Order or external supplier)
- A home icon indicates an internal shipment (from another store in your mSupply system)
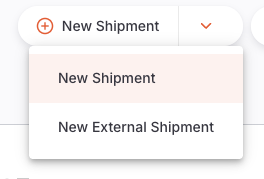
Creating a new External Inbound Shipment🔗
To create an External Inbound Shipment, you need an existing Purchase Order in Sent status.
- Go to
Replenishment>Inbound Shipment - Click the dropdown arrow next to the
New Shipmentbutton - Select
New External Shipment
Select a Purchase Order🔗
A window will appear showing all Purchase Orders with a Sent status. The list displays:
| Column | Description |
|---|---|
| Supplier | Name of the supplier |
| Number | Purchase Order number |
| Ref | Your reference for the Purchase Order |
| Comment | Any comment on the Purchase Order |
Select a Purchase Order from the list. You will then have two options:
- Add with all lines: Creates the External Inbound Shipment and automatically populates it with all lines from the Purchase Order. This is the recommended option in most cases.
- Add with no lines: Creates an empty External Inbound Shipment linked to the Purchase Order. You can then add lines manually.
Once created, the shipment will open in the detail view with the supplier name shown in the top left corner and a status of New.
Add/edit goods received permission to create External Inbound Shipments.
External Inbound Shipment Detail View🔗
The detail view for an External Inbound Shipment has several additional tabs compared to a manual Inbound Shipment:
- Details: The main shipment line view
- Financial: Line-by-line pricing information
- Currency: Foreign currency and charges management
- Delivery: Delivery tracking against the Purchase Order
- Documents: Upload and manage related documents
- Activity Log: View the history of changes
Details Tab🔗
The Details tab shows the shipment lines. For External Inbound Shipments, lines are grouped by PO line number rather than item code. This lets you easily see which Purchase Order line each shipment line corresponds to.
The columns shown include:
| Column | Description |
|---|---|
| PO Line | The line number from the linked Purchase Order |
| Code | Item code |
| Name | Item name |
| Batch | Batch number |
| Expiry | Expiry date of the batch |
| Pack Size | Number of units per pack |
| Packs | Number of packs received |
| Unit Qty | Total units received |
| Auth Status | Line authorisation status (if authorisation is enabled) |
Financial Tab🔗
The Financial tab provides a detailed view of pricing for each line on the shipment. This tab is only available for External Inbound Shipments.
The columns include:
| Column | Description |
|---|---|
| Item Name | Name of the item |
| PO Line | Purchase Order line number |
| Pack Qty | Number of packs |
| Pack Size | Units per pack |
| Unit | Unit of measure |
| PO Price | Price per pack from the Purchase Order |
| Local Cost Price | Cost price in local currency (shown if using foreign currency) |
| Sell Price | Sell price per pack |
| Line Total | Total value for the line |
| Adjusted Total | Total after adjustments |
Currency Tab🔗
The Currency tab allows you to manage foreign currency settings and additional charges for the shipment.
| Field | Description |
|---|---|
| PO Currency | The currency of the linked Purchase Order (read-only) |
| Currency Rate | Exchange rate between PO currency and local currency |
| Charges (PO Currency) | Additional charges (e.g. freight) in the Purchase Order currency |
| Charges (Local Currency) | Additional charges in your local currency |
The tab also shows a summary with total values and the cost adjustment percentage applied across lines.
Delivery Tab🔗
The Delivery tab provides an overview of how much of each item on the Purchase Order has been delivered, both by this shipment and any previous deliveries. This helps you track outstanding quantities.
| Column | Description |
|---|---|
| Item Name | Name of the item |
| Previous Deliveries | Quantity delivered in previous shipments |
| This Delivery | Quantity on this shipment |
| In Transit | Quantity currently in transit |
| Remaining | Quantity still to be delivered |
| PO Quantity | Total quantity ordered on the Purchase Order |
Information Panel🔗
Like manual Inbound Shipments, you can open the Information Panel by clicking the More button in the top right corner. This provides access to:
- Additional Info: Creator, colour, comment
- Related Documents: Links to the associated Purchase Order and any other related transactions
- Invoice Details: Cost totals and service charges
- Transport Details: Booking or tracking reference numbers
External Inbound Shipment Status Sequence🔗
The status sequence for External Inbound Shipments is:
| Status | Description | Editable |
|---|---|---|
| New | Initial status when the shipment is created | Yes |
| Shipped | Goods have been shipped and are in transit | Yes |
| Delivered | You have confirmed that the goods have arrived at your facility | Yes |
| Received | Goods have been inspected and accepted into your inventory | Yes |
| Verified | Final verification is complete. The shipment can no longer be edited. | No |
New to Delivered if the goods arrive before you have a chance to record the shipment as shipped.
Status Transitions🔗
The Confirm button at the bottom right of the screen allows you to advance the shipment to the next status. Use the dropdown arrow to skip to a later status.
| Confirm... | Current Status | Next Status |
|---|---|---|
| Confirm Shipped | New | Shipped |
| Confirm Delivered | Shipped | Delivered |
| Confirm Received | Delivered | Received |
| Confirm Verified | Received | Verified |
Finalise goods received permission.
Hold Checkbox🔗
Located at the bottom left corner of the screen, the Hold checkbox prevents the shipment from being updated to the next status while checked.
Adding Lines to an External Inbound Shipment🔗
Auto-populated Lines from a Purchase Order🔗
If you selected Add with all lines when creating the shipment, lines will be automatically populated from the Purchase Order. These lines include the item, quantity, and pricing information from the PO.
Adding Lines Manually🔗
You can also add lines manually by clicking the Add Item button. The process is the same as for a regular Inbound Shipment with the exception that only items on the purchase order are available for adding to the external inbound shipment.
Editing a Line🔗
To edit a line, click on it to open the edit window. You can adjust:
- Batch and Expiry Date
- Pack Size and Packs Received
- Pricing (cost price and sell price per pack)
- Location for storage
- Auth Status (if line authorisation is enabled - see below)
Deleting Lines🔗
- Select lines by checking the box on the left of the list
- Click
Deletein the footer bar
Verified.
Other Line Actions🔗
When one or more lines are selected, the following actions are available in the footer bar:
| Action | Description |
|---|---|
| Delete | Delete the selected lines |
| Change Campaign/Program | Associate selected lines with a campaign or program |
| Set quantities to 0 | Set pack quantities to zero for selected lines |
| Return selected lines | Create a supplier return for the selected lines |
| Approve | Set line authorisation status to Passed (if authorisation enabled) |
| Reject | Set line authorisation status to Rejected (if authorisation enabled) |
| Pending | Set line authorisation status back to Pending (if authorisation enabled) |
Line Authorisation🔗
External Inbound Shipments support an optional line-level authorisation workflow. When enabled, individual lines must be approved or rejected before the shipment can be received.
Enabling Line Authorisation🔗
Line authorisation is controlled by the store preference External inbound shipment lines must be authorised. This can be enabled in Manage > Stores.
When this preference is enabled:
- Lines added from a Purchase Order will start with a
Pendingauthorisation status - An Auth Status column appears in the line list
- The authorisation status is also editable in the line edit window
Authorisation Statuses🔗
| Status | Description |
|---|---|
| Pending | The line is awaiting review |
| Passed | The line has been approved and can proceed |
| Rejected | The line has been rejected |
Authorising Lines🔗
To change the authorisation status of a line, you can either:
- Select lines in the list and use the Approve, Reject, or Pending buttons in the footer bar
- Edit a line and change the Auth Status dropdown in the line edit window
Passed or Rejected requires the Authorise goods received permission. Users without this permission can only see the current status.
Impact on Status Transitions🔗
When line authorisation is enabled, the shipment cannot be confirmed as Received or Verified while any lines are still in Pending status. All lines must be either Passed or Rejected before the shipment can progress.
Receiving Stock with an External Inbound Shipment🔗
The process for receiving stock follows the same general steps as for a regular Inbound Shipment:
1. Confirm Shipped (optional)🔗
If you know the goods have been dispatched, you can confirm the shipment as Shipped. This is optional - you can skip directly to Delivered.
2. Confirm Delivered🔗
Confirm that the goods have physically arrived at your facility by clicking Confirm Delivered.
3. Confirm Received🔗
After inspecting the goods, confirm the shipment as Received. At this point:
- Items on the shipment are added to your stock on hand
- Items become available for distribution
Passed or Rejected status before you can confirm the shipment as Received.
4. Confirm Verified🔗
Verification is the final step. Check that all information is correct:
- Batch numbers and expiry dates
- Quantities and pack sizes
- Pricing information
- Storage locations
Once verified:
- The shipment status is set to
Verified - Shipment lines can no longer be edited
- The shipment cannot be deleted
Permissions🔗
External Inbound Shipments use a separate set of permissions from regular Inbound Shipments:
| Permission | Description |
|---|---|
| View goods received | View External Inbound Shipments |
| Add/edit goods received | Create, edit, and delete External Inbound Shipments |
| Authorise goods received | Approve or reject lines (when authorisation is enabled) |
| Finalise goods received | Confirm the shipment as Verified |
These permissions can be configured for each user in the mSupply central server.
Returning Stock from an External Inbound Shipment🔗
You can return stock received via an External Inbound Shipment by creating a Supplier Return. The process is the same as returning stock from a regular Inbound Shipment:
- Open the External Inbound Shipment
- Ensure the status is at least
Delivered - Select the line(s) you want to return
- Click
Return selected linesin the footer bar - Follow the prompts to specify quantities and reasons
Upload Documents🔗
The External Inbound Shipment includes a Documents tab where you can upload and manage related documents such as delivery notes, transport documents, or temperature records. Select Upload Document at the top of the screen and choose a file to upload.
You can download or delete previously uploaded documents by selecting a document in the list and choosing the appropriate action in the footer bar.