Internal Orders
Internal Orders go by several other names in certain countries or systems:
- Requisitions
- Orders
- Report & Requisition
- R&R
Internal Orders are a way to support users in requesting new stock from another store.
Viewing Internal Orders🔗
If you would like to order some stock from your supplier:
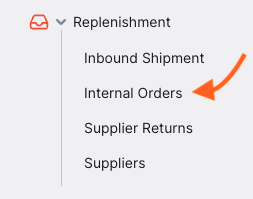
- Navigate to the
Replenishmentmenu - Tap on
Internal Orders
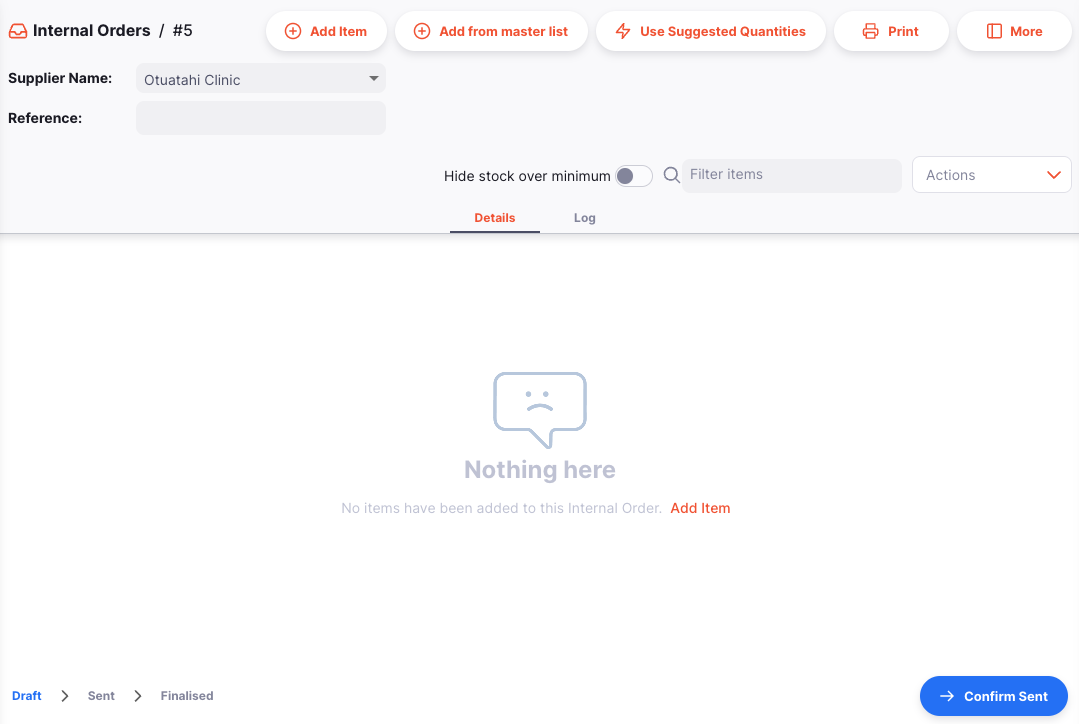
You will see a list of all existing Internal Orders:
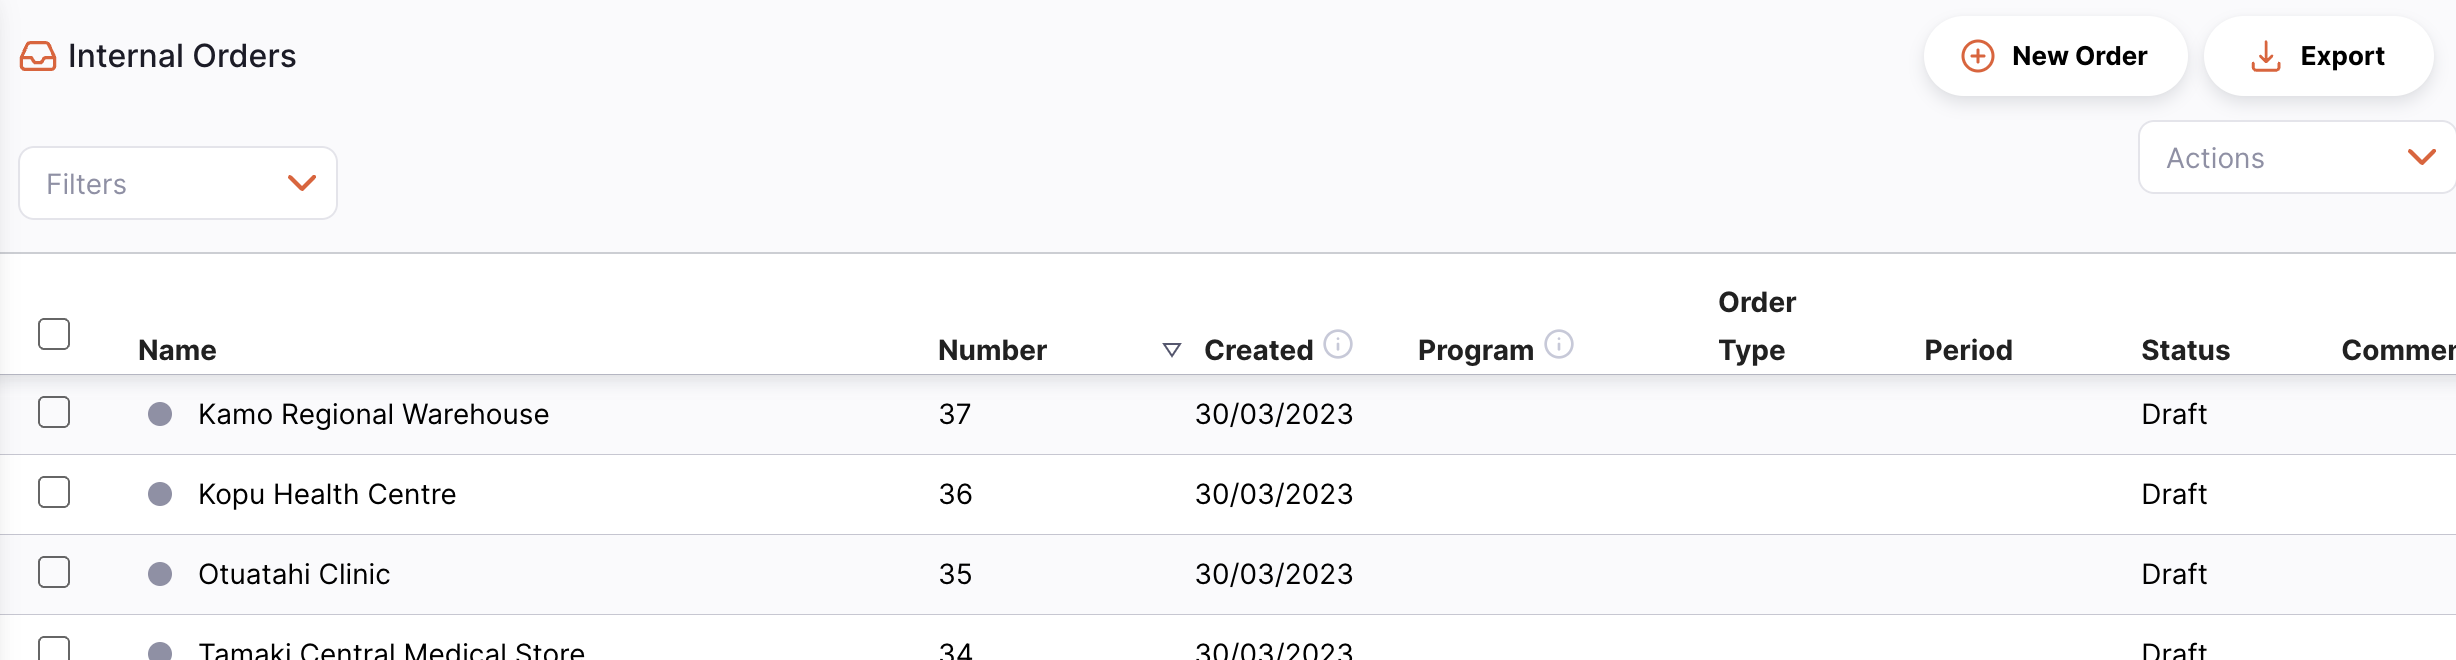
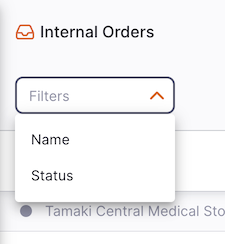
You can use the filters to filter the list by the name, status, or requisition number of the Internal Orders:
You can sort the list using the column headers:
- Tap the column header of the column that you want to sort. The column is sorted in ascending order.
- Tap the column header again and column will be sorted in the opposite order.
Creating a new Internal Order🔗
Select a supplier🔗
- Click on the
New Orderbutton (top right corner):

- A new window opens, inviting your to select a supplier:
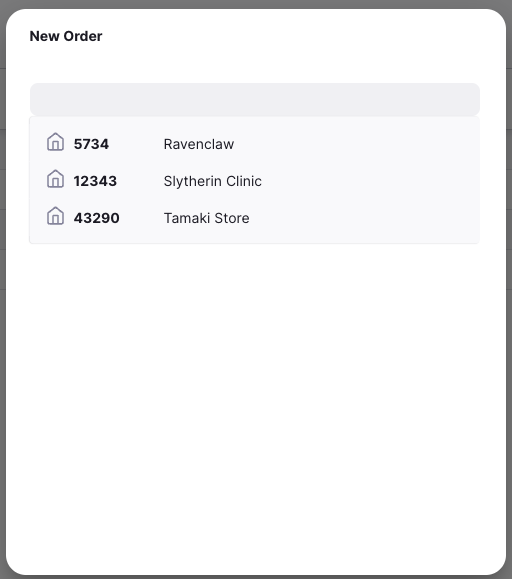
- Select a Supplier by pressing on their name. You will be redirected to a window like this:
Defining Reorder threshold MOS (Minimum MOS)🔗
The Reorder threshold MOS (previously known as Minimum MOS) is used in the calculation of the Suggested Quantity. If the MOS for an item is greater than the Reorder threshold MOS then the system will not calculate a suggested quantity value. See the Suggested Quantity section for more detail.
If you have a threshold value set you can also filter the list of items on this internal order by switching the Hide stock over minumum toggle. This will hide items for which you have stock levels over this threshold.
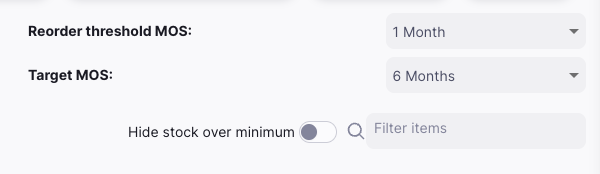
Defining Target MOS (Maximum MOS)🔗
Defining the Target MOS (Month of Stock) is critical to the calculation of the Suggested Quantity:
- There is an industry rule of thumb that the Target MOS should be set to 3 times the ordering cycle
- The default Target MOS is
3.0, which is based on a monthly ordering cycle - If for example, the ordering cycle was every two months, then Target MOS should be set to 3 x 2 =
6.0

This can be done before or after adding items to your order.
Adding a single item🔗
Tap on Add Item to add a single item to your order.
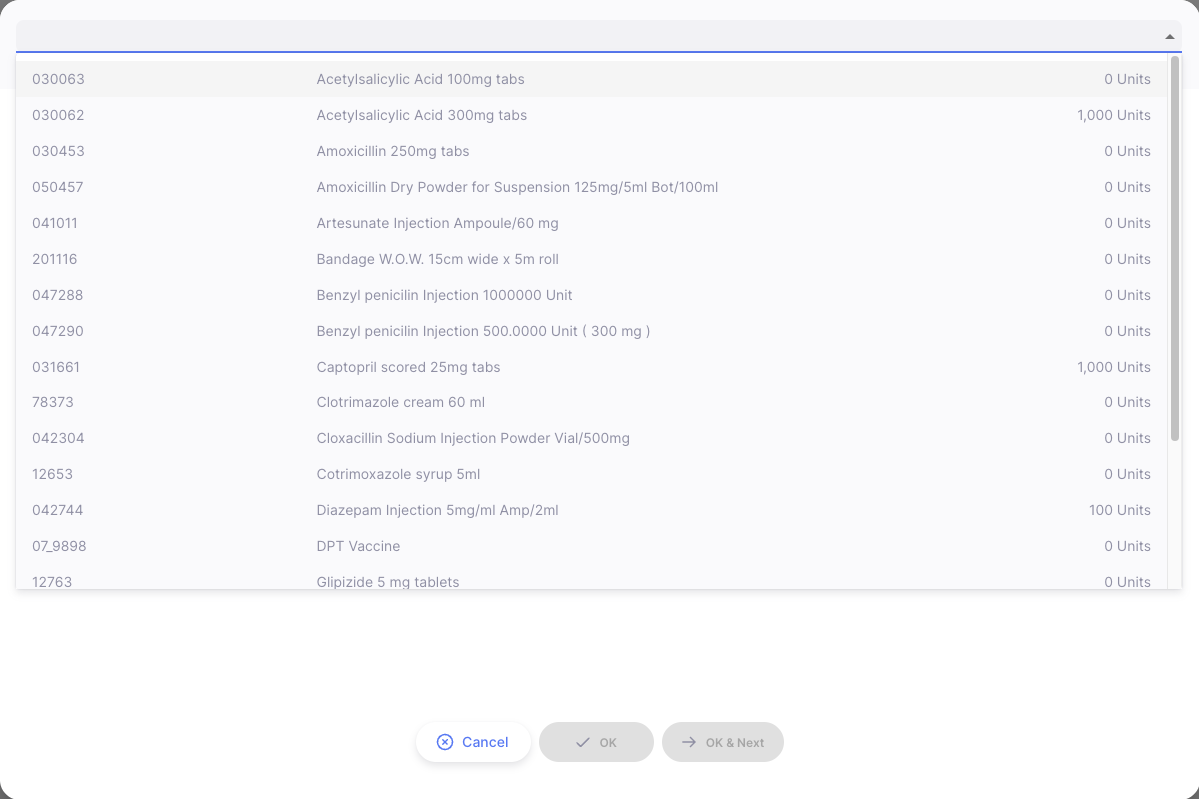
First select the item you want to add to your order. You can also type some or all of an item name (or code) to look for a specific item.
Once an item is selected, you should see the following information on the page.
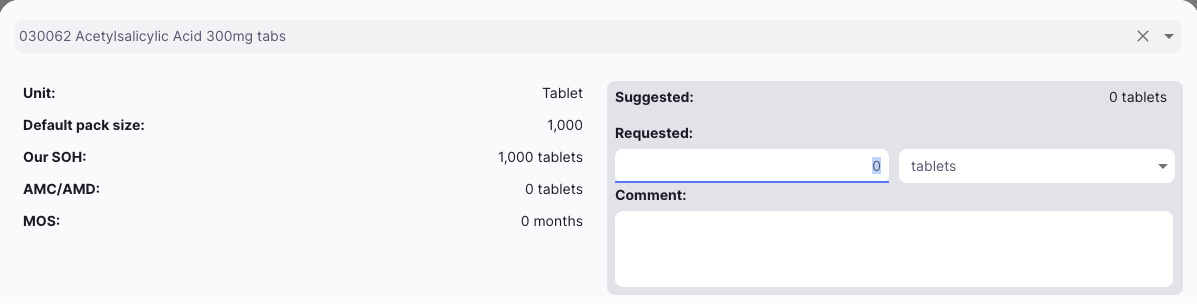
-
Unit: the unit which is defined on the item (e.g. Tablet, Vial)
-
Default pack size: the default pack size of the item
-
Doses per unit: (shown only if this item is a vaccine) this is the number of doses per unit e.g. per Vial
-
Our SOH: Stock on Hand. How much stock the store currently has available
-
AMC/AMD: Average Monthly Consumption/Average Monthly Distribution. How much stock your store uses each month on average (based on a configurable number of months, default is set to 3 months)
-
MOS: Months of Stock - how many months the current stock will last, if used at the average monthly rate (AMC)
-
Suggested: the number of units which mSupply suggests that your order to reach your stock target quantity
-
Requested: the number of units that you request from your supplier
-
Pack/unit/dose selector: a drop down to choose between ordering in units, packs, or doses, depending on your store preferences. See Requesting a quantity for details.
-
Comment: any comments you want to add to the order
Additionally, if you have are viewing a program order, and have the store preference Use consumption & stock from customers for internal orders enabled in your store then you will see some additional fields:
- Short expiry: how many units of this item have an expiry date within the next 3 months
- Stock arriving: how much stock has been added by shipments within the period of this internal order
- Outgoing: how much has been taken out of stock by shipments within the period of this internal order
- Losses: how much has been taken out of stock by stocktakes or inventory adjustments within the period of this internal order
- Additions: how much has been added to stock by stocktakes or inventory adjustments within the period of this internal order
- Days out of stock: the number of days within the period in which the store had no stock of this item
You can also see the following charts:
- Target Quantity: In this chart, you will see the following information:
- The Target Quantity for the item. This is calculated as: Target MOS x AMC.
- Your current Stock on Hand (in grey)
- The Suggested Order Quantity calculated by mSupply


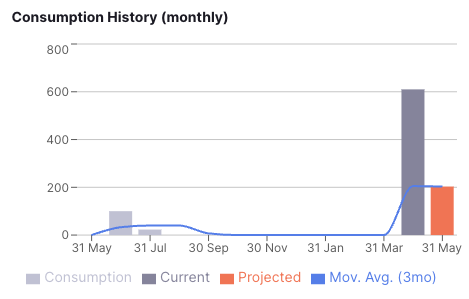
- Consumption History (monthly): this chart shows the monthly consumption up to 12 months in the past (in grey), the current AMC (in dark grey), the projected consumption (in orange) and the moving average (blue line):
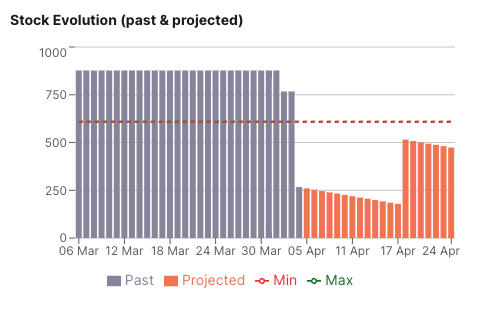
- Stock Evolution: this chart shows you your stock level for the last 30 days and your projected inventory for the next 30 days. The projected stock will be updated based on your inputs in the
Requested quantityfield:
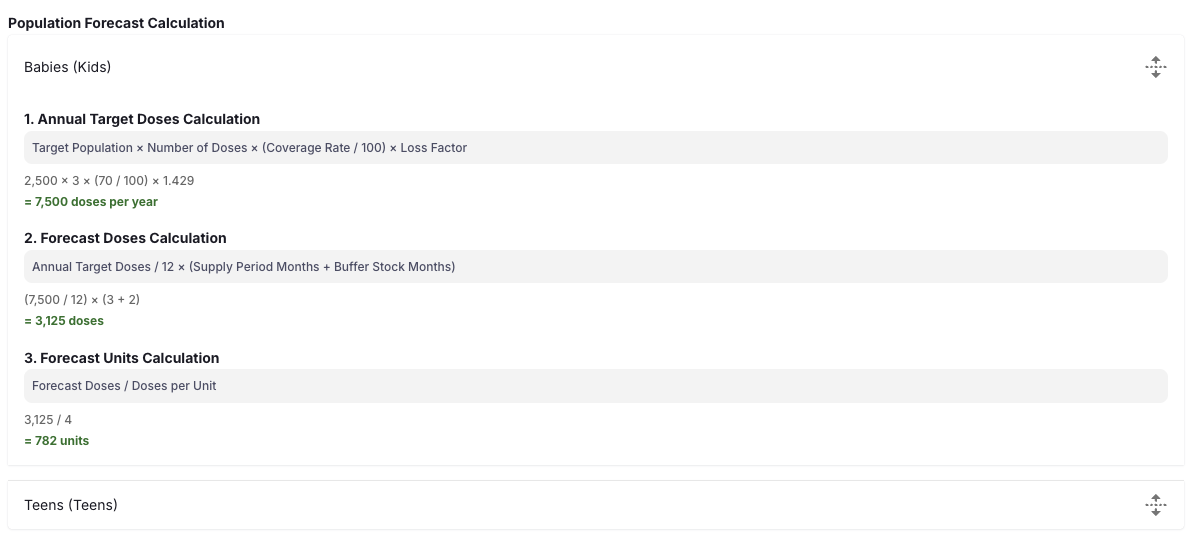
If you have the global preference Display population based forecasting
enabled, you will see the population based forecasting calculation instead.
Requesting a quantity🔗
The drop down next to the Requested field allows you to switch between entering quantities in units, packs, or doses. When you change the selection, the displayed values for stock on hand, AMC and suggested quantity displayed in packs, units, or doses to match the selector.
The available options depend on your store preferences. The packs option is available when the store preference Order in packs is enabled. For vaccine items, the doses option is available when the store preference Manage vaccines in doses is enabled. If both preferences are enabled, the packs option is selected by default.
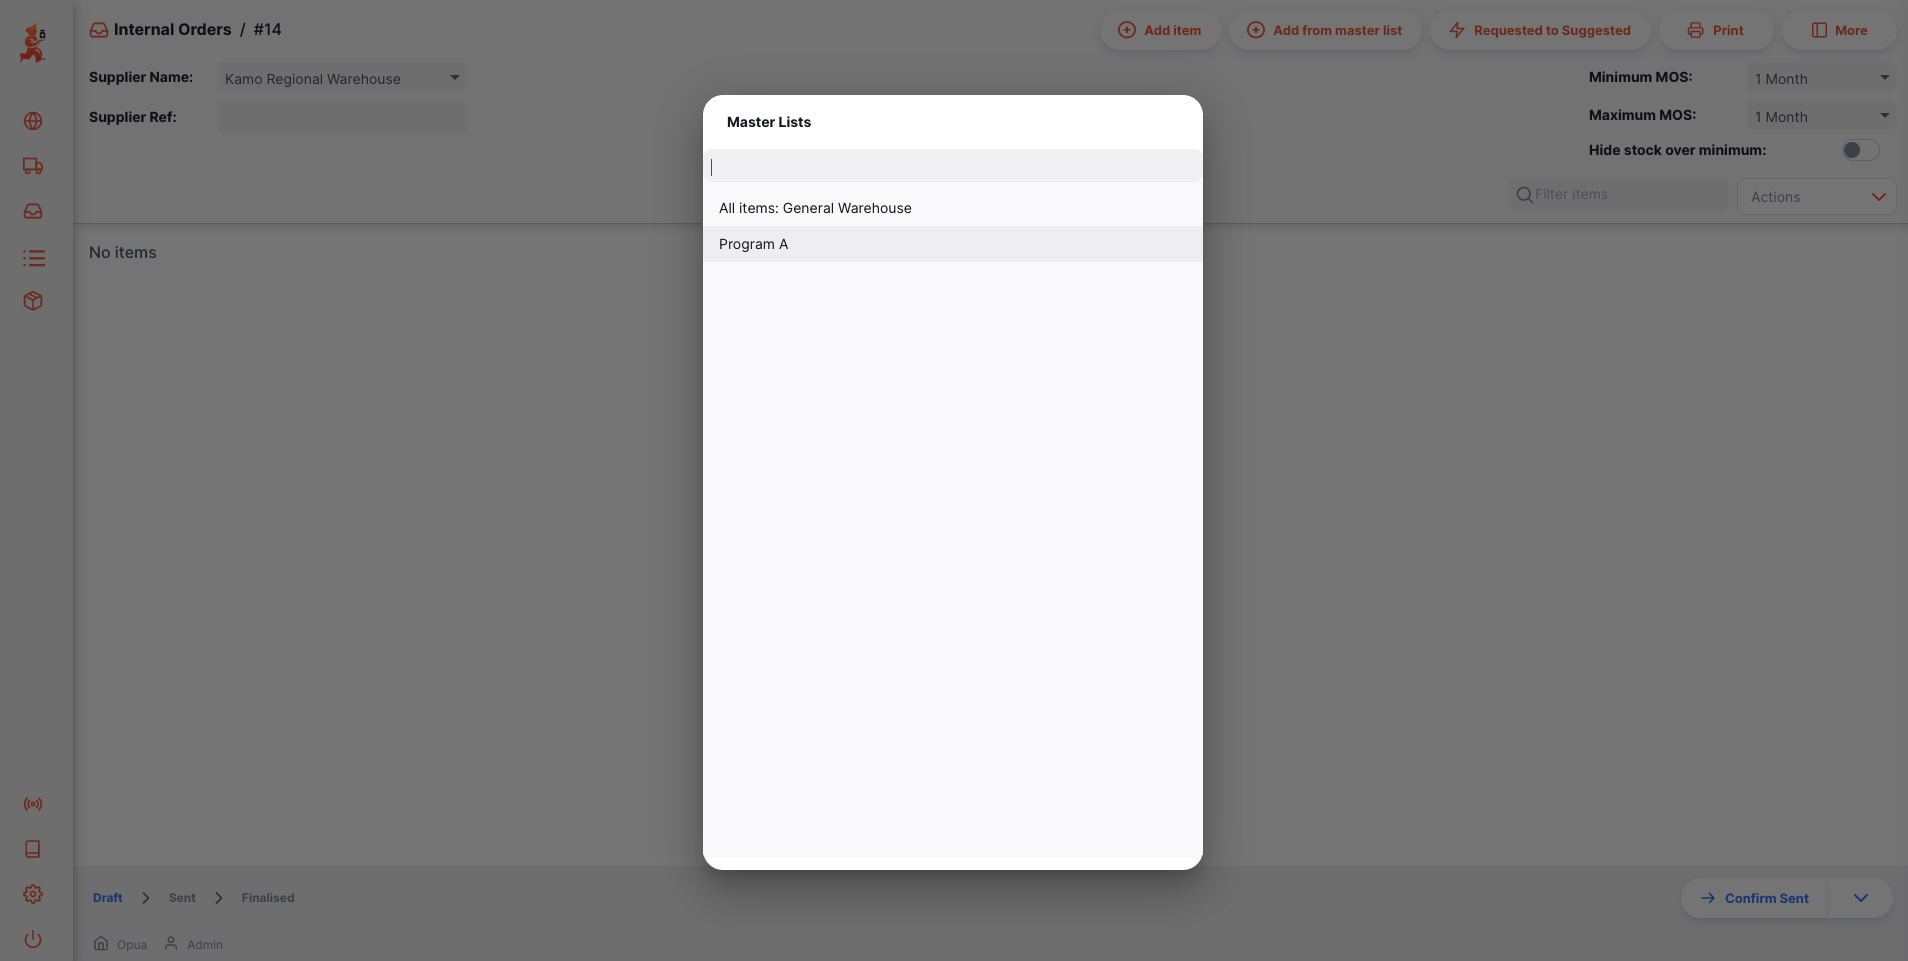
Adding items using a master list🔗
If your organisation is using Master Lists, you can add multiple items at once using your store's master lists. It is particularly useful when you have a lot of items in your order and you don't want to add them all one by one.
- Tap on the
Add from master listbutton - Select a master list
- A dialog window opens asking you whether you want to add all of the items from this master list. Tap
OKif you wish to proceed.
All the items of the master list are now listed in your order. If you had previously added single item, it will add items that are not already there.
Tap on an order line to change the Requested Quantity or tap on the Use Suggested Quantities button to automatically copy the values in the Suggested Quantity column into the Requested Quantity column.
Also be aware that if you are using programs functionality, only master lists which are not part of a program can be selected.
If you don't find the master list you are looking for and if you want to create a new one, please contact your administrator.
Reading the Internal Order's list🔗
When you add items (using a master list or not), the item is added to the order's table. The following information is provided for each order line:
| Column | Description |
|---|---|
| Code | Code of the item |
| Name | Name of the item |
| Unit | Unit of the item e.g. Tablet, Capsule, Vial |
| Doses per unit | If the store preference Manage vaccines in doses is enabled for your store, this column is added. It shows the number of doses per unit e.g. Vial, if the item in this row is a vaccine and - if it isn't. |
| DPS | Default pack size of the item |
| SoH (Est. remaining) | Stock on Hand: how much stock is currently available in your store for this store |
| AMC | Average Monthly Consumption: how much stock your store uses each month on average (based on a configurable number of months, defaults to 3 months). This column is hidden when population based forecasting is enabled for vaccine items. |
| Target Stock (AMC) | This is the stock you are aiming for. Calculated as: AMC x Target MOS |
| Suggested Quantity | How much stock mSupply suggests that your order. This is calculated as: (AMC x Target MOS) - SoH |
| Requested | This is set to zero by default. This is the quantity of units you are ordering from your supplier. |
Suggested Quantity🔗
The value for the suggested quantity will be zero if any of these conditions are true:
- The AMC value is
0 - The Target MOS value is
0 - The number of months of stock for the item is more than the Reorder threshold MOS
If none of these conditions are true then the suggested quantity is given by the following formula:
(Target MOS - MOS) * AMC
and then rounded up to the nearest whole number.
Ancillary items🔗
If items in your order have ancillary supplies configured (see Ancillary Supplies), a notification banner will appear at the top of the order:

This tells you that related supplies are missing from your order, or that the quantities of supplies already in your order need to be updated.
There are two situations:
- Items need to be added: one or more ancillary supply lines are missing from the order entirely.
- Quantities need to be updated: ancillary supply lines are already in the order, but the quantities are out of date (for example, because you changed the requested quantity of a principal item after the ancillary items were added).
Viewing what will change
Click Details on the banner to see exactly which items will be added or updated and what quantities will be used.
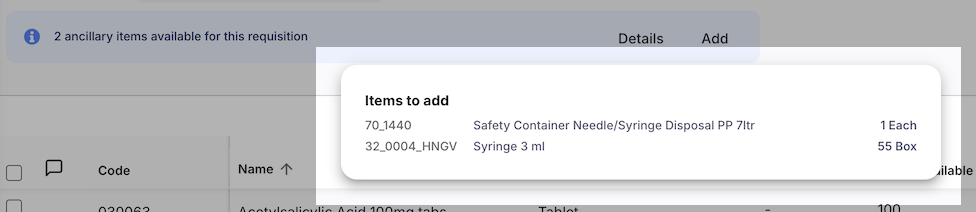
Adding missing ancillary items
Click Add on the banner to add all missing ancillary supply lines to the order. The system automatically calculates the required quantities based on the ratio configured for each item.
After adding, if any quantities still need updating (because a the requested quantity of the principal item has since changed), the banner will reappear showing that an update is needed.
Updating ancillary item quantities
If you have already added ancillary items and then changed the requested quantity of a principal item, the banner reappears with an Update button. Click the button to recalculate and refresh the quantities of the ancillary lines.
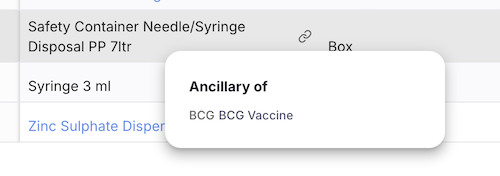
 ) showing after their name. Hover over this to display which principal item caused this ancillary item to be included.
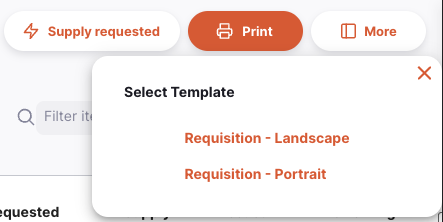
Printing an Internal Order🔗
When viewing a specific Internal Order, simply click the Print button which is on the top right of the page.
When printing, a PDF file is generated for you, which will then open in a new browser tab. This can then be printed using your browser by clicking print or using control+P (if using windows) or cmd+P keys on your keyboard (if using a mac).

This will either
- Show a menu of possible reports for you to select from before creating a PDF. This will happen if there are more than one report defined for the
Requisitionreport type. - Create a PDF immediately, if there is only one report to select from
Sending an Internal Order🔗
You will need the permission Can confirm Internal Order as Sent to be able to send an Internal Order:
- Tap on the
Confirm Sentbutton (bottom right corner) - A dialog window opens asking you whether you are sure to want to send the order. Tap on
OKto proceed - Status of your order is now
SENTand the order is no longer editable
Approving Internal Orders🔗
Remote approval process🔗
Some stores may require their requisitions to be approved by specific users before they can be fulfilled. For a full description of this process refer to the mSupply Remote Authorisation documentation.
To do this:
- In the requesting store, enable the store preference
Include requisitions from this store in supplier's remote authorisation process - In the supplying store, enable the store preference
Use remote authorisation for response requisitions
For further detail on configuring store preferences, refer to the mSupply documentation on the topic.
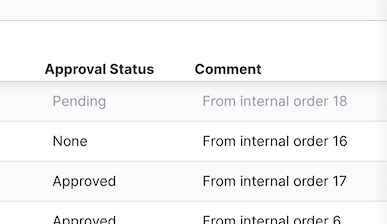
When configured in this way, the requesting store will see an additional column in the Internal Order list, showing the approval status:
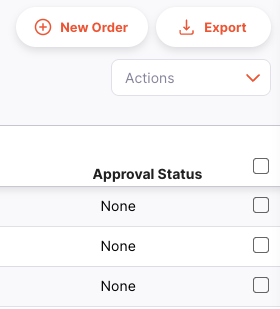
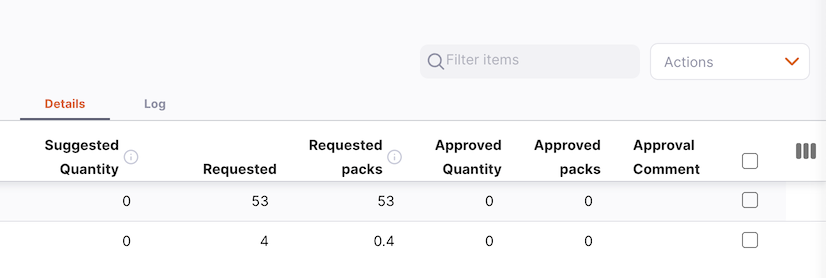
And when viewing a specific Internal Order, there are columns showing the approved quantity, approved number of packs and a comment entered by the approver, if there is one:
Similarly, the supplying store will have an additional column in the requisition list view showing the approval status :
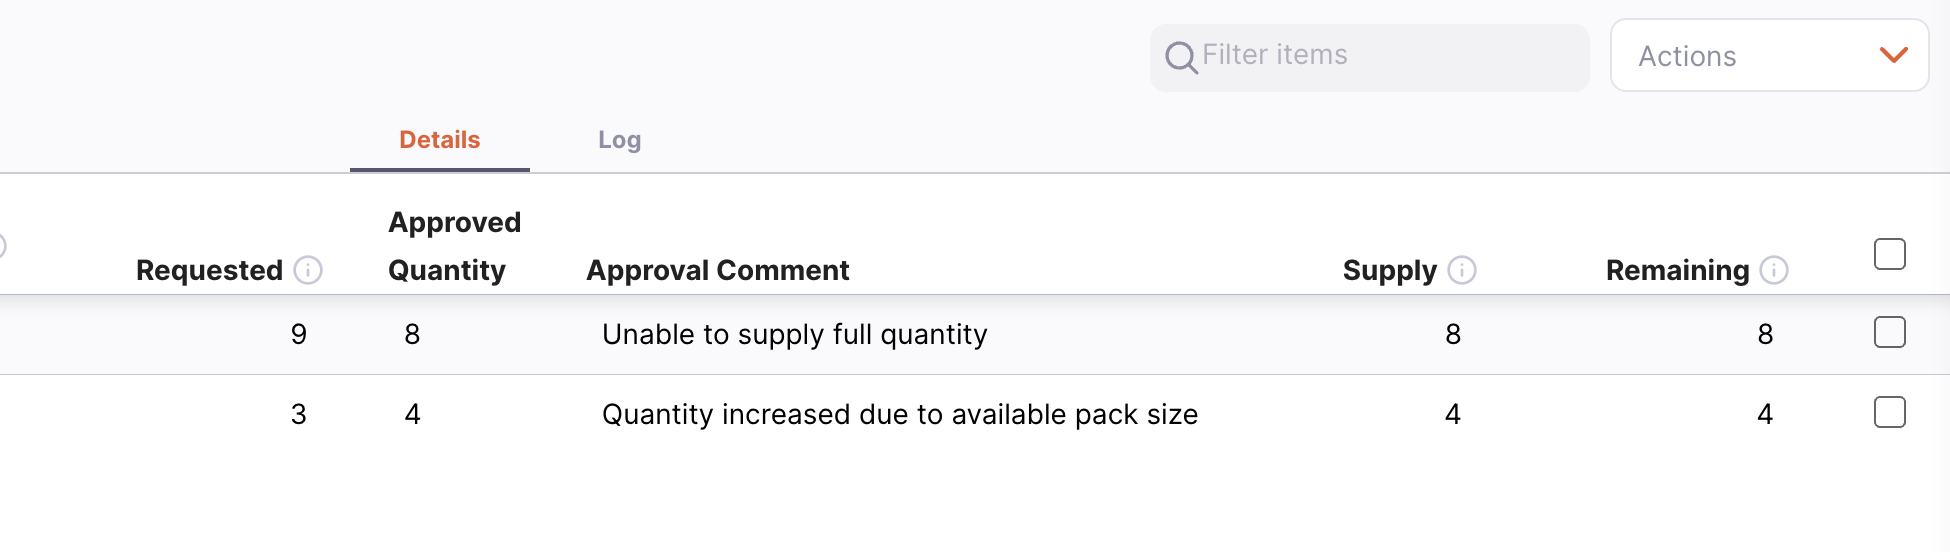
And finally, a specific requisition will also have new columns, for the approved quantity and an approval comment, if one has been entered by the approver:
Local approval process🔗
Another option for implementing an approval step for Internal Orders is to enable what is called 'local approval'. With this, you can allow only certain users to change the status of an Internal Order to Sent. To allow a user to change the status of an Internal Order to Sent, they require the permission Can confirm Internal Order as Sent to be enabled.
To set the permission, edit the user within mSupply and change to the Open mSupply permissions tab, shown below:

Without this option checked, the user will not be able to update the Internal Order status to Sent and the order is unable to be processed.
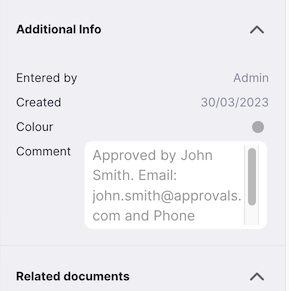
On changing the status to Sent, the user's details are added to the comment field; this can be seen when viewing the Internal Order, in the detail panel:
and is also shown to the approver in the remote authorisation web application if that is being used.
The additional text is of the form:
Approved by [user's full name]. Email: [user's email address] and Phone Number: [user's phone number].
These details are taken from the user, as configured in mSupply. Refer to the Managing Users section on how to do this.