Requisitions
Managing your customers' orders
When a customer orders stock from you, they create an Internal Order in their store. This will appear as a Requisition in your store.
Viewing Customers' Requisitions🔗
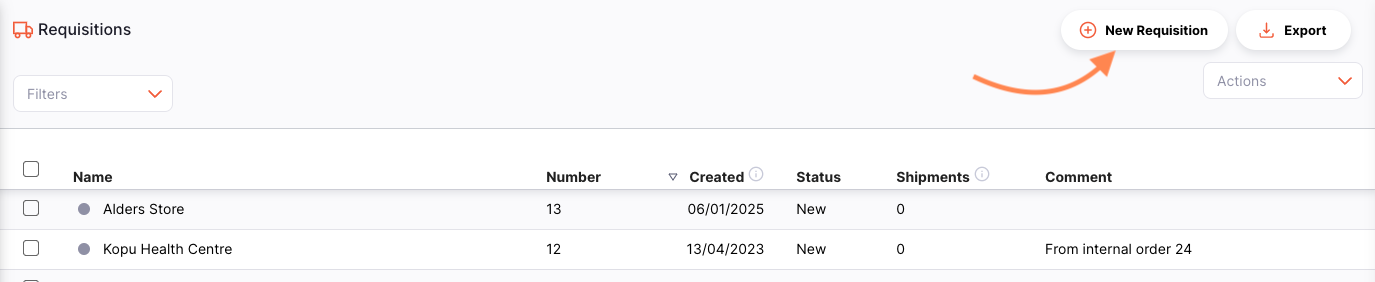
To know if you have received requisitions from your customers, go to Distribution > Requisition

You should see a list of all requisitions sent by your customers.
From this screen you can:
- View a list of Requisitions
- Export Requisitions to a
.csvfile
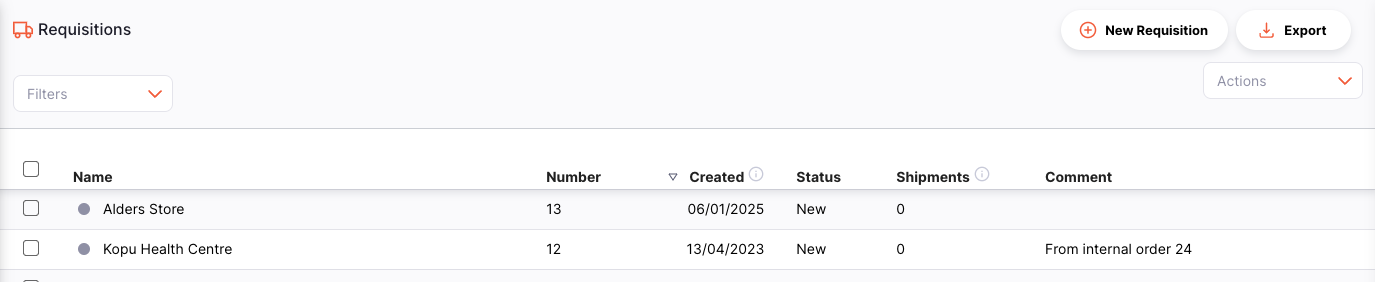
Requisition list🔗
The list of Requisitions is divided into 6 columns:
| Column | Description |
|---|---|
| Name | Name of the Customer |
| Number | Reference Number of the requisition |
| Created | Creation Date of the requisition |
| Status | Current Status of the requisition |
| Shipments | Number of shipments created from the requisition |
| Comment | Comment for the requisition |
Filter Requisitions🔗
You can filter the list of requisitions by name, status, requisition number or whether shipments have been created. This can be useful if you're looking for one particular requisition!
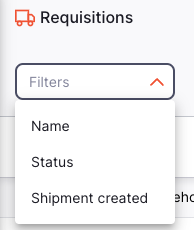
Select the desired filter(s) from the list:
- Name: Start typing in the field to filter by customer name
- Status: Select a status from the dropdown list
- Requisition number: Enter a requisition number to find an exact match
- Shipment created: Toggle on to only show requisitions where shipments have been created
All the requisitions which match the filters will appear in the list.
Exporting Requisitions🔗
The list of Requisitions can be exported to a comma separated file (csv). Simply click the export button (on the right, at the top of the page)
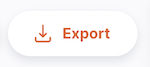
and the file will be downloaded. The export function will download all Requisitions, not just the current page.
Delete a Requisition🔗
You can delete a requisition from the Requisition list.
- Select the requisition that you want to delete by checking the box on the left end of the list. You can select more than one requisition to be deleted. You can even select them all by using the master checkbox in the header.
- The
Actionsfooter will display at the bottom of the screen when a requisition is selected. It will display the number of requisitions selected and the actions which can be taken. ClickDelete. - A confirmation window will appear, asking you to confirm the number of requisitions to be deleted.
- After clicking
OK, a notification will appear in the bottom left corner, confirming that the selected requisitions were deleted.

Viewing a Requisition🔗
To view the detail of a particular requisition, simply click on it in the list view. You will then see the detail view of the requisition:
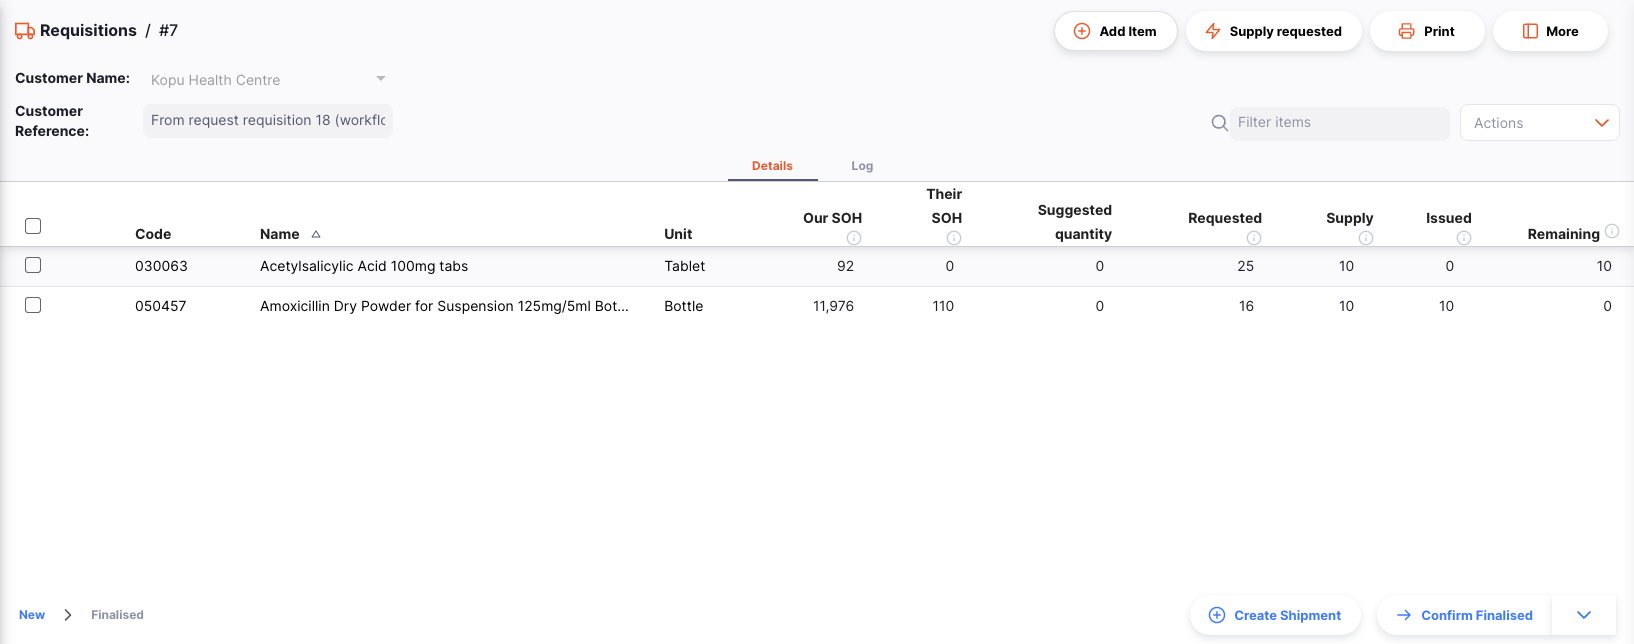
Enter a Customer Reference🔗
The customer reference is automatically generated when the customer creates an Internal Order, but you can also enter a customer reference manually.
View or Edit the Requisition Information Panel🔗
The information Panel allows you to see or edit information about the Requisition. It is divided into three sections:
- Additional Info
- Related documents
- Actions
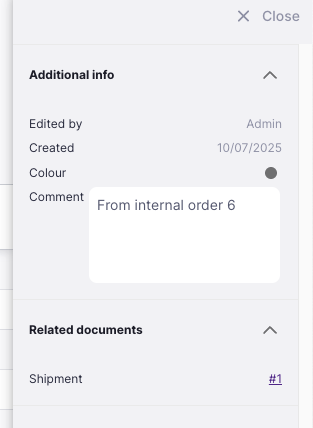
Additional Info🔗
In the Additional Info section you can:
- See who created the Requisition (name of the user)
- See when the Requisition was created
- View and edit the Requisition colour. To edit the colour, tap on the coloured circle and select a colour from the pop-up
- Write or edit a comment
Related Documents🔗
In the Related Documents section you can see other related transactions for the Requisition.
If you have created shipments for the Requisition, the shipment numbers will appear in this section along with a link to view the shipment.
Actions🔗
Copy to clipboard: You can tap on the Copy to Clipboard button to copy
the Requisition details to the clipboard.
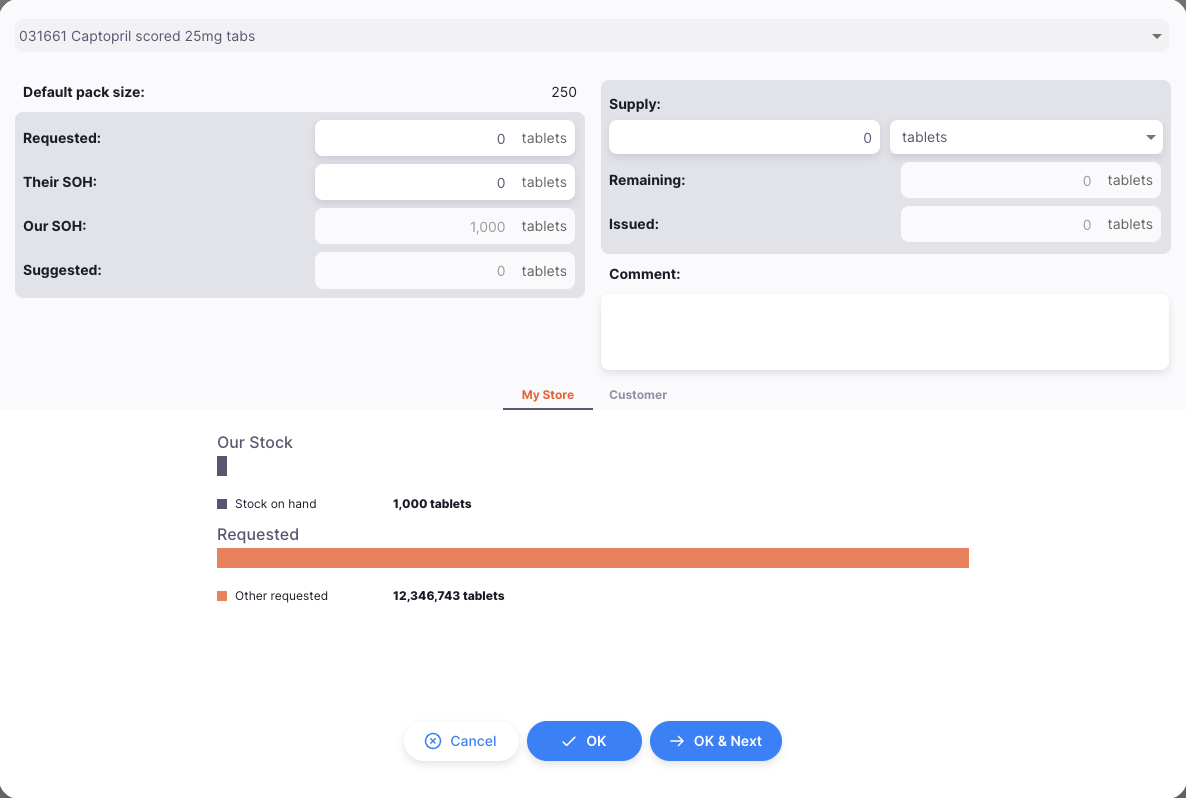
Requisition Detail🔗
| Column | Description |
|---|---|
| Code | Code of the item |
| Name | Name of the item |
| Unit | The unit of measure for the item |
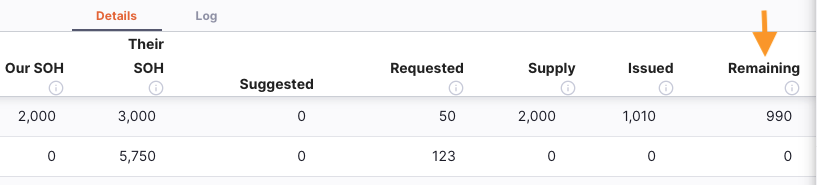
| Our SOH | How much stock is available in this store |
| Their SOH | How much stock is available in the customer's store |
| Requested | The quantity requested by customer |
| Supply | The quantity that will be supplied by this store (quantity can differ from what is being requested) |
| Issued | The quantity that has already been issued in Outbound Shipments |
| Remaining | The quantity remaining to be supplied to the customer. The calculation is 'Supply - Issued'. This quantity will be re-calculated after an Outbound Shipment has been created. |
Supply Requested🔗
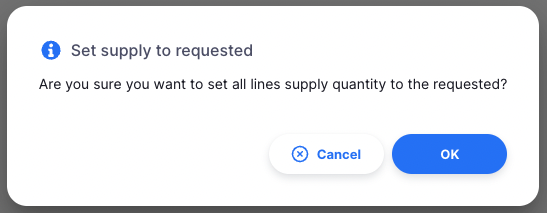
To quickly fulfil all quantities requested by the customer, simply click the Supply Requested button at the top of the page. This will automatically match the supply quantity to the requested quantity for each item.

Click the button and you are asked for confirmation before the adjustment happens:
Adding items🔗
To add additional items to the requisition that the customer did not request, you may press the "Add item" button to search for and add an item.
Editing items🔗
Clicking on an item row in the table will open the line details where you will see information about the item such as your stock on hand, and the requested quantity.
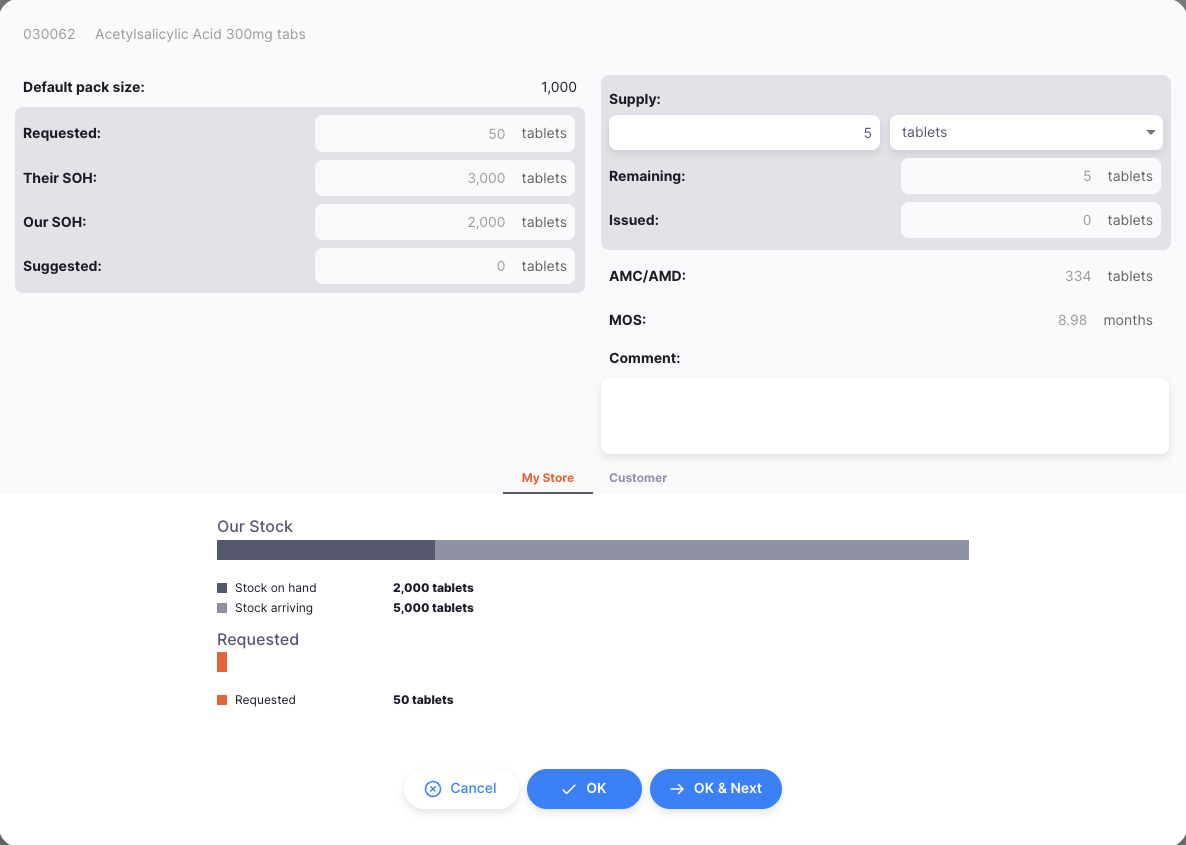
Here, you can set how much you wish to supply the customer. The dropdown next to the supply quantity allows you to choose whether you want the display the amounts in units (e.g. "Tablets" in this case) or in packs, based on the item's default pack size.
- AMC/AMD: The "Average Monthly Consumption" of the customer, also known as "Average Monthly Distribution".
- MOS: The "Months of Stock" the customer has. This is "Their SOH" divided by "AMC/AMD".
- Comment: you may leave a comment on the line, perhaps explaining decisions on why to supply more or less than what the customer requested.
My Store Tab🔗
This displays information about your store's stock levels and outstanding orders, alongside your customers' requested quantities.
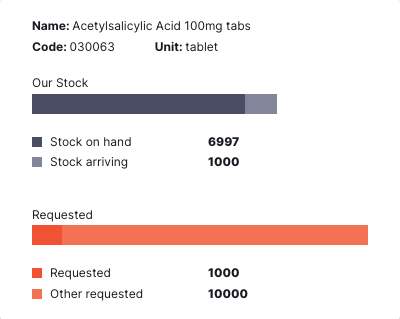
The first bar:
- Your stock on hand for this item
- Any incoming stock for this item that has been
Shipped, but not yetDelivered - The quantity being requested for this item in any
Internal Orders
The second bar:
- Requested: The quantity being requested for this item in this Requisition
- Other requested: The quantity being requested in other pending Requisitions from all customers to your store.
Customer Tab🔗
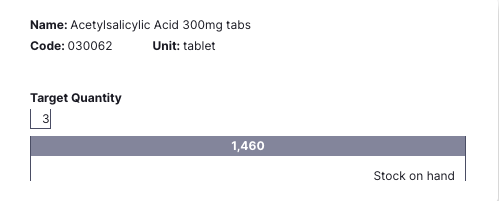
- The customer's Target Quantity for this item. This is calculated as: Target MOS x AMC
- The customer's stock on hand for this item
- The customer's available storage volume and location type information. If the supply quantity would exceed the customer's available storage capacity, a warning will be displayed to help prevent over-supply.
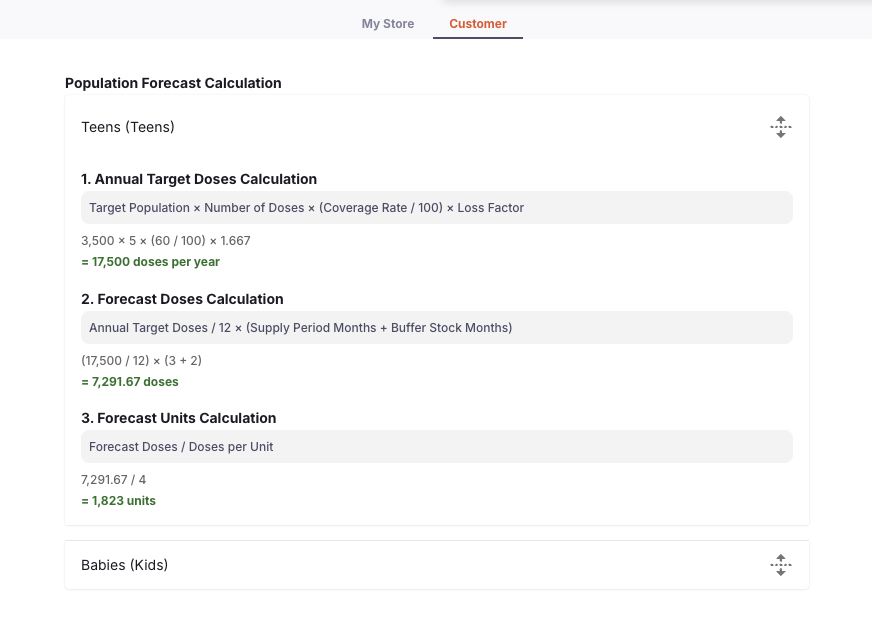
If you have the global preference Display population based forecasting
enabled, you will see the population based forecasting calculation instead.
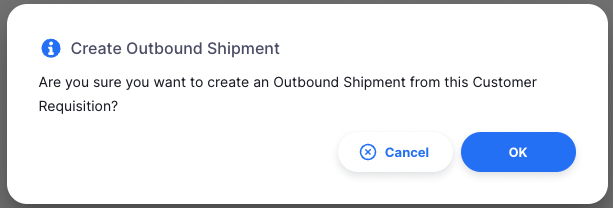
Creating an Outbound Shipment from a Requisition🔗
Once you are happy with the supply quantities, you can create an Outbound Shipment which will supply the items requested by going back to the Requisition
Detail page.
Click on the Create Shipment button. This will create a shipment, add all of the items which are not fully supplied, and then, open that shipment in a new tab. Before doing so, you are prompted to confirm:
If either the supply quantity has been changed in the requisition or the outbound shipments quantities are changed, there might be some quantities remaining to be supplied. Any new shipments created using the Create Shipment button will automatically include these remaining quantities (calculated as the supply quantity minus the quantity already included in any linked outbound shipments).
After creating the shipment, you will see the shipment number, along with a link to view it, in the Related documents section of the additional details panel on the right of the screen.
Manual Requisition🔗
Usually, Requisitions will be sent to you by your Customers. However, if they aren't using mSupply, you can create a Requisition manually.
Creating a Manual Requisition🔗
- Go to
Distribution>Requisition - Press the
Create Requisitionbutton at the top right of the page
- A new window will appear where you can select the customer for whom you want to create the requisition. You can search for the customer by typing their name or code in the search bar or by scrolling through the list of customers.
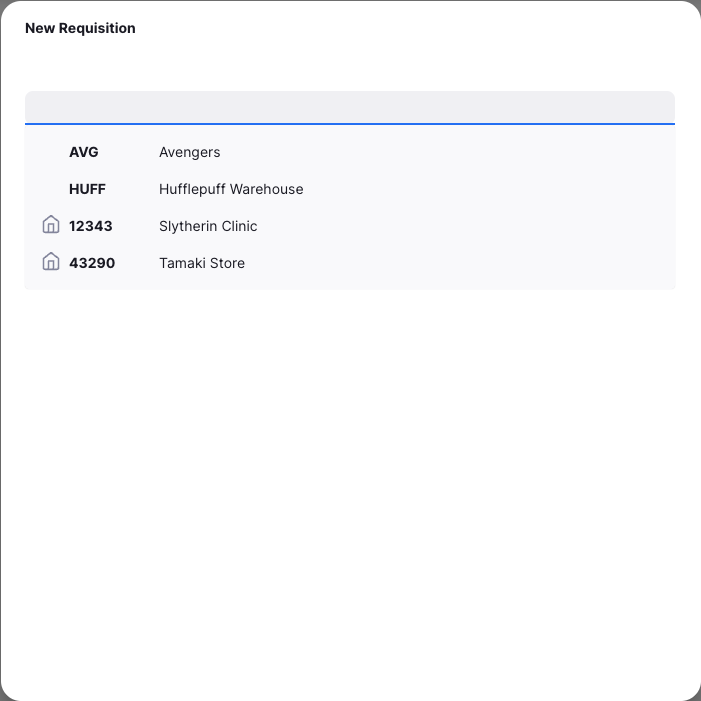
- Once you have selected the customer, you will be taken to the requisition detail page where you can add items to the requisition.
Adding items🔗
Similar to normal requisitions from customers, you can add items to the requisition and then edit them:
The key difference when entering a manual requisition on behalf of a customer is that you must enter the "Requested" and "Their SOH" (Stock On Hand) fields for them. Typically, users of this feature have received a paper requisition form from the customer, which includes this information, either based on the customer’s own stock records or a quick stock take they performed to provide an accurate SOH value.
Creating an Internal Order from a Requisition🔗
- If your store has the Can create Internal Order from a
Requisition preference enabled,
you can create an Internal Order directly from a Requisition by clicking on the
Create Orderbutton at the top right of the Requisition list view

- You will be prompted to select a supplier to send the Internal Order to
- Once selected, a list of unfulfilled requisitions (i.e. where supply does not equal to requested) will be displayed for you to choose from
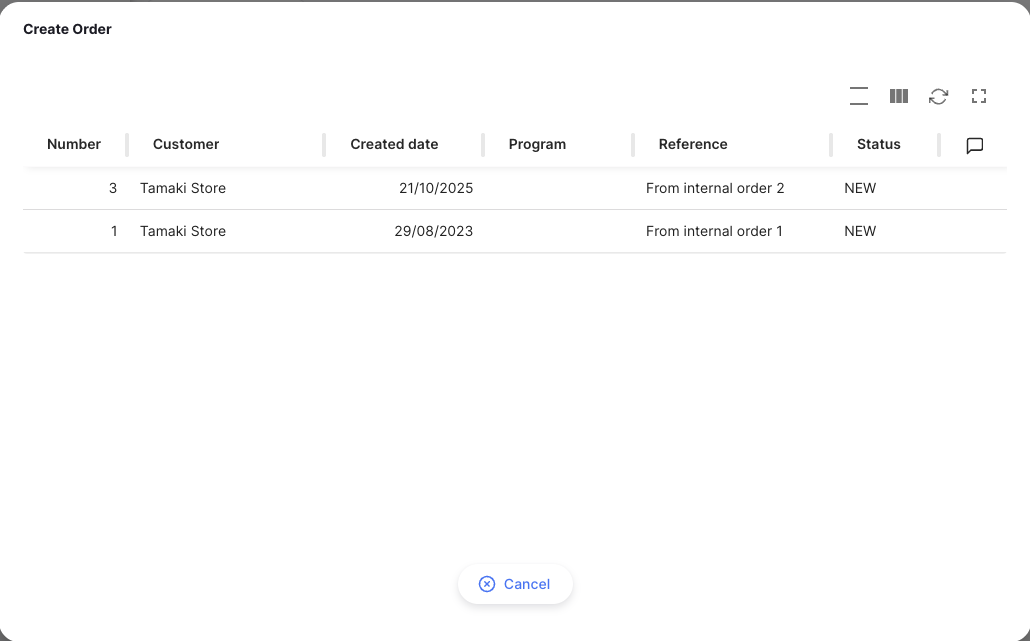
- Once you have selected a requisition, you will be redirected to the Internal
Order page. The lines in the order will be pre-filled with the items from the
requisition, with the quantities set to the
requested - supplyamount. - Here you can select the destination store for the Internal Order if your store has the Select destination store for an Internal Order preference enabled. This will default the customer of the supplier's Outbound Shipment to the selected destination store.